OSPF
| Done |
|---|
It was created by a Dutch scientist called Edsger Dijkstra.
There are three versions of OSPF:
- OSPFv1
- OSPFv2 - Which is widely used for IPv4
- OSPFv3 - Which can be used for IPv4, but is mainly used for IPv6
Each router will create what is called a LSA (Link State Advertisement), which will be flooded to all its neighbors. Those other routers will store those LSAs containing information about the connected interface of the first router in their LSDB (Link State Data Base). This way the routers can create a “connectivity map” of the whole network and make individual decisions based on it.
Each LSA have a aging timer of 30 minutes
Basically in OSPF the is three steps:
- Become neighbors with other routers connected to the same segment
- Exchange LSAs with neighbor routers
- Each router calculate the best route to each destination based on the Dijkstra algorithm and add it to their routing table
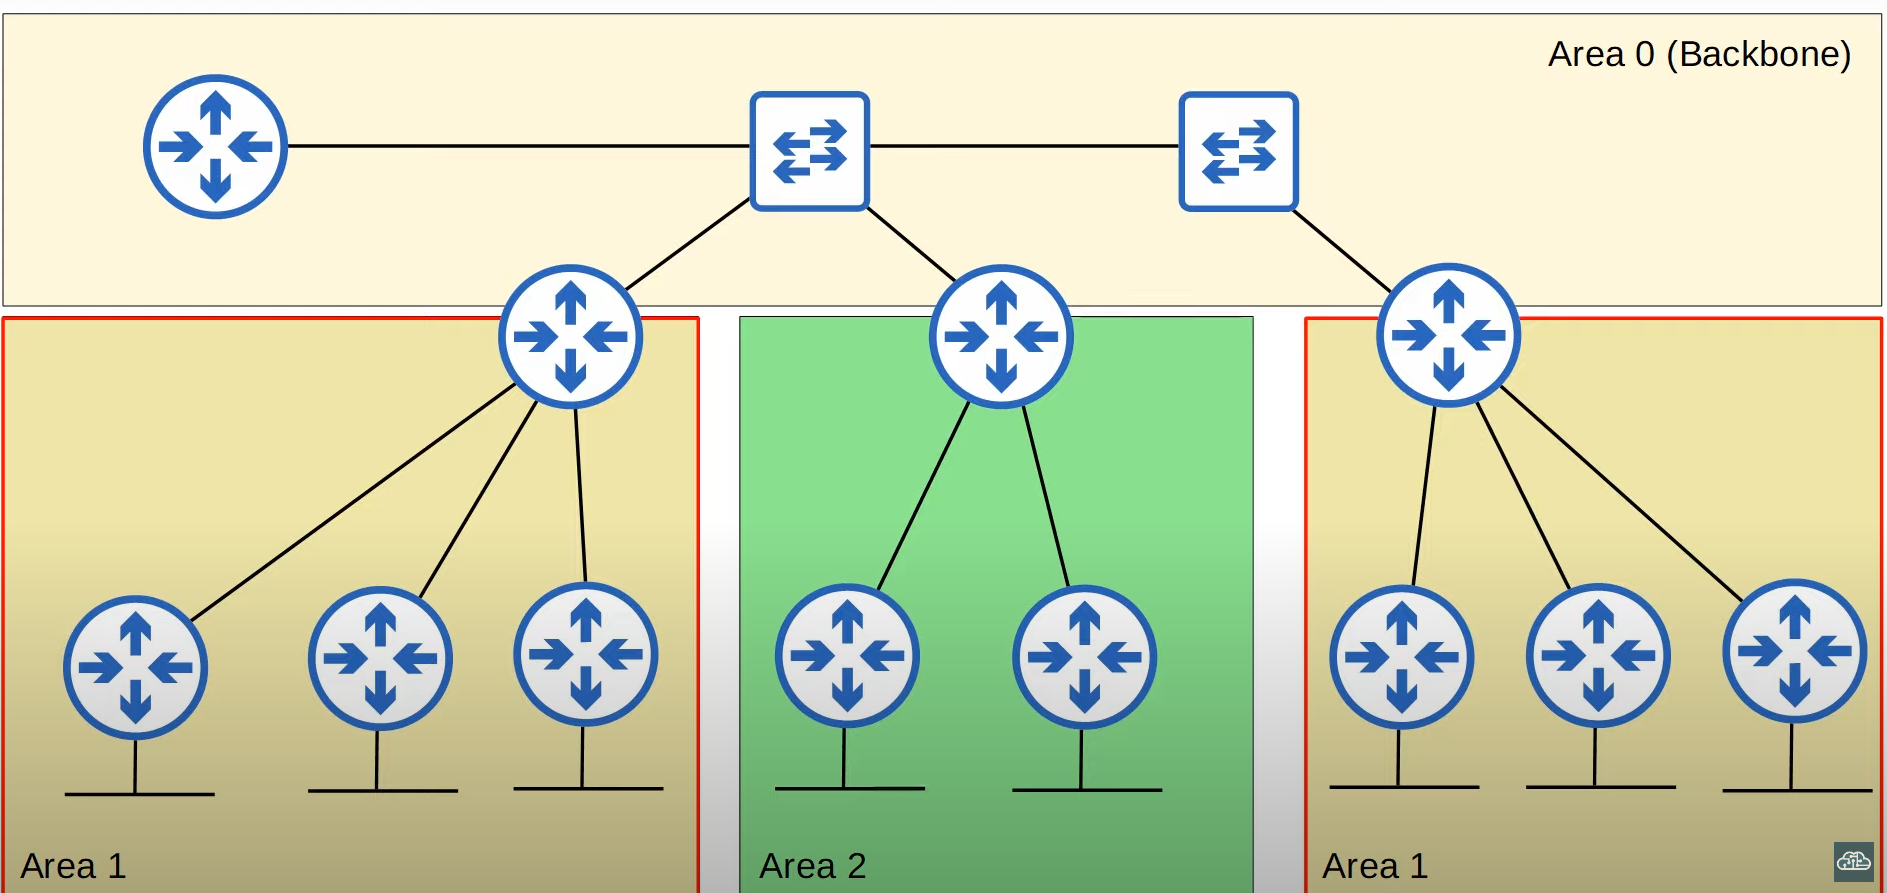
OSPF Areas
OSPF can be divided in areas (segments) to divide up the network. There is barely no benefit to divide it on a small network, however, in a large network with hundreds of routers and more than a thousand subnets a single area of OSPF can have some negative effects:
- Routers can take longer to calculate routes
- It usually requires more processing power
- Every small change on the network will cause all the routers to run SPF algorithm again
- A huge LSDB will take a great space of the memory
- The area is a set of routers and links that share the same LSDB.
- The backbone area (area 0) is an area that all areas must connect to.
- Routers with all the interfaces in an area are called internal routers.
- Routers with interfaces in more than one area are called ABRs (Area Border Router).
- Usually is recommended that an ABR be connected to up to 2 areas, to avoiding overburdening them.
- Routers connected to the backbone area are called backbone routers.
- A router can be called more than one thing.
- A route to a destination in the same OSPF area is called a intra-area route.
- A interarea route is a route to a destination in a different OSPF area.
Requirements
- All OSPF areas must be contiguous. It means that an area cannot be split up and exist separately with the same number. For example, the following is wrong:
- All OSPF areas, as said before, must have at least one ABR connected to the backbone are (area 0)
- OSPF interfaces must be in the same area to become OSPF neighbors
- An Autonomous System Boundary Router (ASBR) is a router that connects the OSPF network to an external network. This is due to the default-information originate command, usually when connected to the internet.
Configure OSPF
First create the OSPF instance
configure terminal
router ospf {value}Then specify the interfaces to active OSPF, those interfaces will both:
- Send OSPF messages
- Be advertised
network {subnet-id} {wildcard}Disable OSPF messages in a given interface
By disabling the OSPF messages, it will still be advertised to the active neighbors, while not sending OSPF hello messages on that given interface. Usually this interface is connected to a subnet that has no other router.
passive-interface {interface}Disable OSPF messages on ALL interfaces
passive-interface defaultThen you can no passive-interface interface on each interface to enable OSPF messages on that given interface. Basically, it is the other way around.
Advertise the default route
default-information originateChange Router ID
router-id {ip address like value}Change the ECMP Maximum routes
maximum-path {number routes}Directly active OSPF in an interface
configure terminal
interface g0/0
ip ospf {process-id} area {area-number}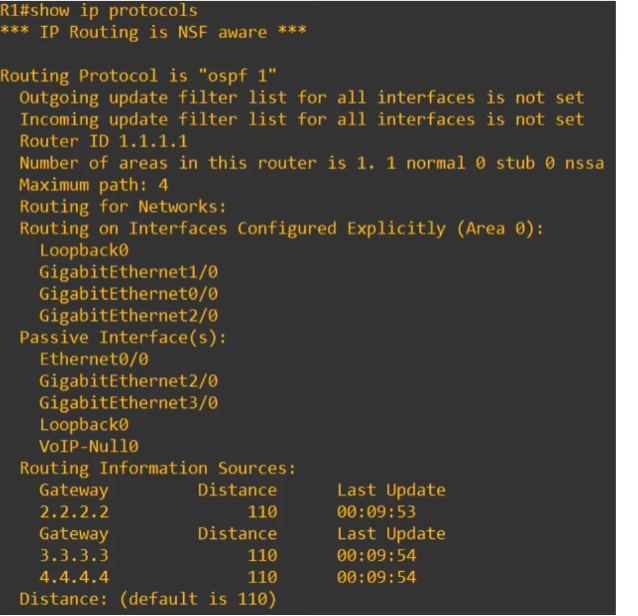
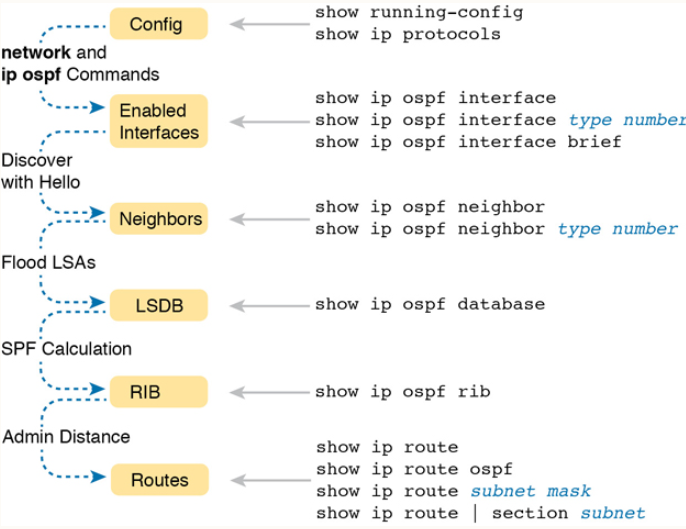
Show Commands
View LSDB
show ip ospf databaseView OSPF Neighbors
show ip ospf neighborView OSPF Interfaces
show ip ospf interface [interface]show ip ospf interface briefCost
OSPF`s metric is called cost. It is calculated based on the bandwidth (speed) of the interface.
How do you calculate the cost of an individual interface?
It is done by dividing the reference bandwidth for the interface`s bandwidth. And, the reference bandwidth is 100 mbps by default.
For example, for a interface with speed of 10 Mbps we have:
For a interface with a bandwidth of 100 Mbps we have:
For a Gigabit interface with a bandwidth of 1000 Mbps we have:
And so on…
//This command allows for the reference bandwidth to be greater, so faster interfaces
//can have lower costs compared to slower interfaces.
router ospf {value}
auto-cost reference-bandwidth {value-in-megabits-per-second}How do you calculate the Total Cost?
The Total Cost is calculated by summing the cost of each outgoing/exit interface in the route for a destination
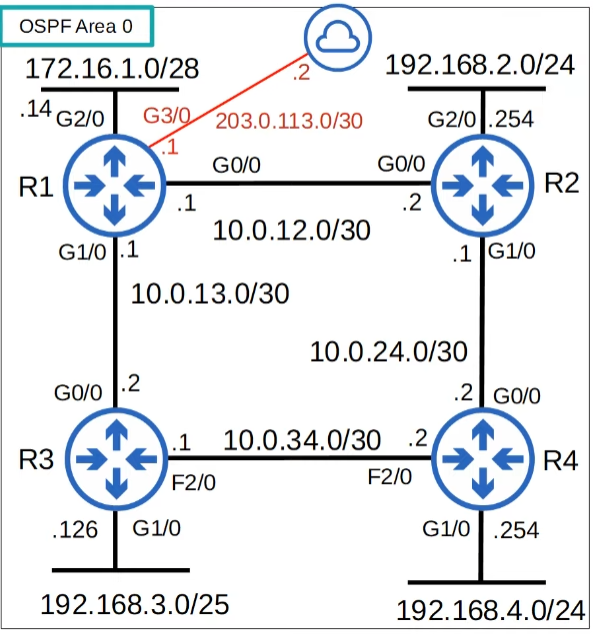
For example, the route from R1 to the subnet “192.168.4.0/24”, with a reference bandwidth of 100000 Mbps, is:
Another example, the cost to reach 2.2.2.2 (Loopback interface on R2) from R1, would be:
You can change a single interface cost
To do so, you must use the following options:
Option #1 - OSPF Cost
configure terminal
interface g0/0 //Enter interface configuration mode
ip ospf cost {value}
This setting will override the auto-calculation done by reference-bandwidth/interface-bandwidth
Option #2 - Change the interface`s bandwidth
By doing so it will alter the value of interface-bandwidth used in the OSPF auto-calculation of cost. HOWEVER, it will also change the value of other protocols calculations, so it is NOT RECOMMENDED.
configure terminal
interface g0/0
bandwidth {value-in-Kb} //Often use "?" to check the unit of the value being entered
How to check the OSPF Cost in all interfaces
show ip ospf interface briefOSPF Neighbors
- Once OSPF is activated in an interface, it sends a OSPF Hello message at regular intervals (determined by the hello timer). These are used to introduce the router to potential OSPF Neighbors.
- The default hello timer is 10 seconds on an Ethernet connection
- The OSPF hello messages are multicast to 224.0.0.5
- OSPF messages are encapsulated in an IP Header with the protocol number of 89.
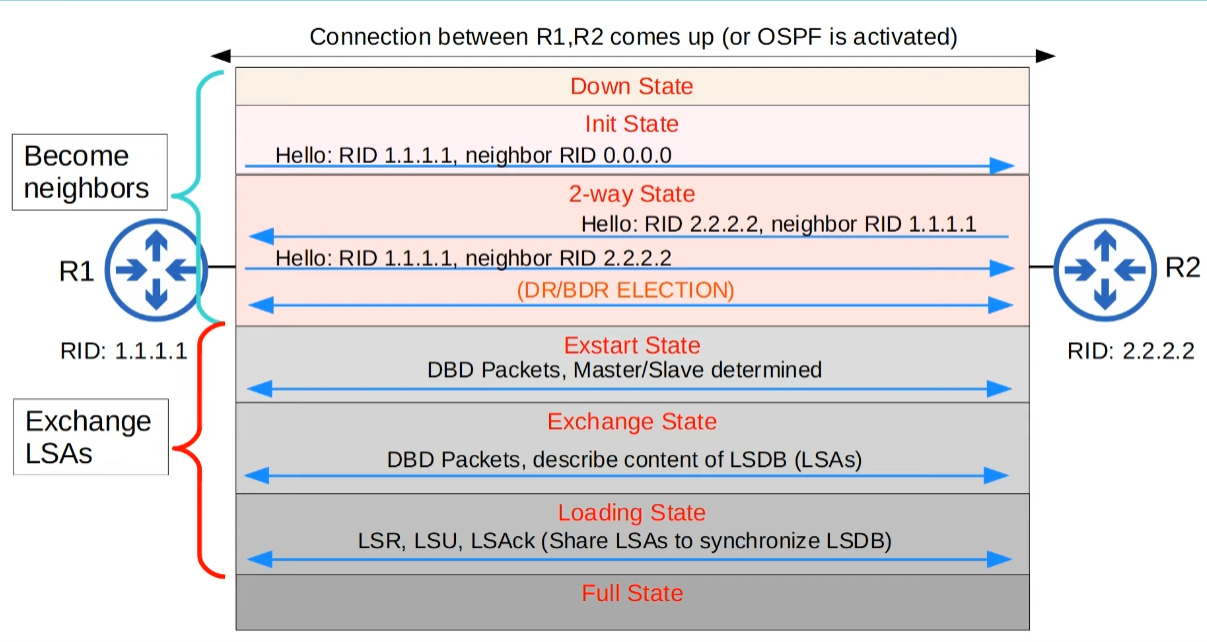
Steps in Becoming Neighbors (Neighbor States)
- Down
- First router sends a OSPF Hello message with the multicast address of 224.0.0.5, containing the following fields (at least):
- Router ID: Their own Router`s ID as explained before
- Neighbor RID with the value of 0.0.0.0, because it doesn`t have that neighbor yet on the neighbors table
- First router sends a OSPF Hello message with the multicast address of 224.0.0.5, containing the following fields (at least):
- Init
- Hello Packet received in R2, but its own Router ID is not specified in the Hello message.
- R2 adds the sender`s RID in its OSPF Neighbors table
- R2 will then send a Hello Message with its Router ID in the RID field and the original sender Router ID in the Neighbor RID field
- 2-Way
- Hello Packet received with it`s own Router ID on the Neighbor RID field. This happens with R1 and R2, both entering this state.
- R1 adds the R2 to its OSPF Neighbor table
- Conditions have been met to be OSPF Neighbors
- A DR (Designated Router) and a BDR (Backup Designated Router) may be selected at this point
- ExStart
- Decides, by DBD (Database Description) packets exchange, which one will be the Master, which will start the exchange of LSAs, and which one will be the Slave
- The Master is the one with the higher RID, and obviously, the Slave is the one with the lower RID.
- Exchange
- Routers then exchange what LSAs they have, being the Master the first one to send it, not in details, via DBDs to each other. Basically they say what they have in their LSDB without telling the full details.
- Routers in this phase will compare the LSAs in those DBDs with what they have in their LSDB, and see LSAs it doesn`t have so can ask later in the next phase.
- Loading
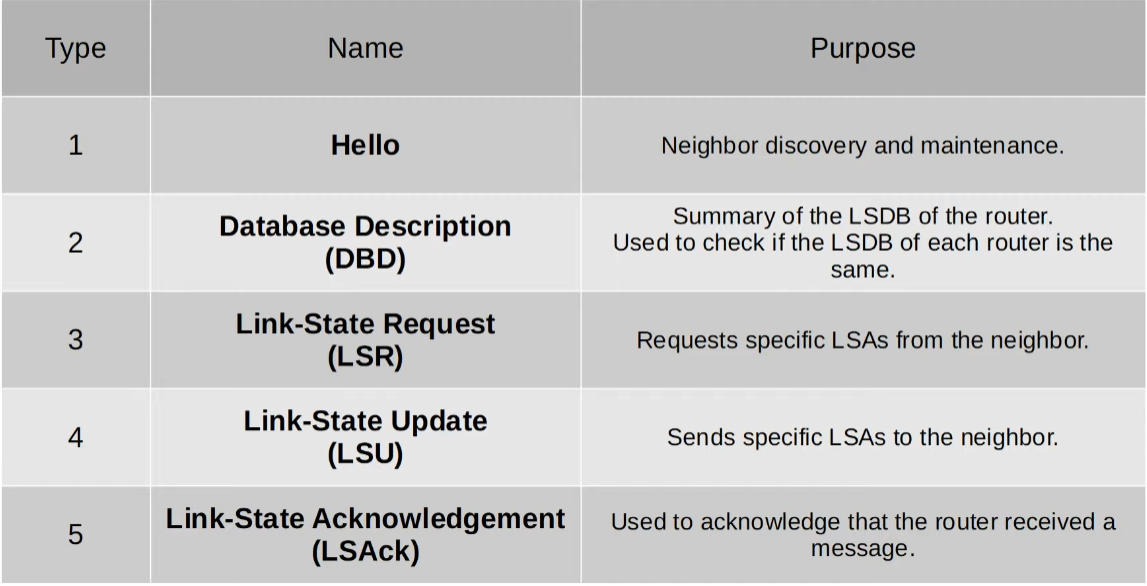
- After knowing what they neighbors have that they don`t, R2 (from his perspective for better understanding) asks for the LSAs via LSR (Link State Request).
- R1 then receives that LSR, making it send a LSU (Link State Update) containing the LSAs requested by their R2, its neighbor.
- Finally, after receiving that LSU, the R2 send back an LSAck (Link State Acknowledgment) notifying R1 that it received successfully the LSU.
- Full
- In this state, both routers have formed Adjacency and both have identical LSDBs
- Each one will continue to send OSPF Hello messages every 10 seconds (by default) to maintain their relationship
- The Dead Timer is the amount of time an interface can still not receive a OSPF Hello message from its neighbor before removing it from its OSPF Neighbors list.
- They continue to send LSAs to each other after every change in the network.
OSPF Network Types
It refers to the type of connection between OSPF Neighbors, and they can be:
- Broadcast
- Enabled by default on Ethernet and FDDI (Fiber Distributed Data Interfaces) interfaces.
- Routers dynamically discover neighbors by sending/receiving OSPF Hello messages with the multicast address of 224.0.0.5.
- A DR and a BDR must be elected on each subnet. (If there is a subnet with only one router, that router will be de DR). Also, by exclusion, a router that is neither a DR or a BDR, is called a DROther.
- Point-to-Point
- Enabled by default on PPP (Point-to-Point Protocol) and HDLC (High-Level Data Link Control) interfaces.
- These Layer 2 Protocols are used in serial connections
- The default encapsulation on a serial connection is HDLC, or Cisco`s version: cHDLC
- To change to PPP, do encapsulation ppp on interface configuration mode on each side.
- In a serial connection, one side is the DCE (Data Communication Equipment) and the other is the DTE (Data Terminal Equipment), with the DCE dictating the clock rate (speed) of the connection with the clock rate value command.
- To know which is the DCE and which is the DTE do show controllers interface-id
- The default encapsulation on a serial connection is HDLC, or Cisco`s version: cHDLC
- As the name implies, it is a connect between only one point to another (1:1), so no DR and BDR have to be selected, since there is no need to reduce the amount of LSAs being flooded, it can have a DROther.
- These Layer 2 Protocols are used in serial connections
- Enabled by default on PPP (Point-to-Point Protocol) and HDLC (High-Level Data Link Control) interfaces.
- Non-Broadcast
- Enabled by default on Frame Relay and X.25 interfaces.
DR, BDR and DROther
- In the broadcast type, routers will only form a full adjacency with the DR and BDR. Therefore, DROthers will not exchange LSAs between each other, only with the DR and BDR.
- All routers will still have the same LSDB, but less LSAs will be flooded in the network.

Election of DR and BDR
In order of priority:
- Highest OSPF interface priority
- Highest Router ID
“First place” becomes the Designated Router (DR) and the “second place” becomes the Backup Designated Router.
Change an interface OSPF Priority
configure terminal
interface g0/0
ip ospf priority {0-255}
Change the Network Type of an interface
configure terminal
interface g0/0
ip ospf network {brodcast/non-broadcast/point-to-point/point-to-multipoint}
Change the Hello and Dead Timers
configure terminal
interface g0/0
ip ospf hello-interval {time-in-seconds}
ip ospf dead-interval {time-in-seconds}
Authentication setting
You can specify a password for routers to become neighbors
configure terminal
interface g0/0
ip ospf authentication-key {password}   //Specifies the OSPF password
ip ospf authentication                  //Enables OSPF Authentication
OSPF Neighbor Requirements
- Area numbers must match
- interfaces must be in the same subnet
- It most not be shutdown
- OSPF Router IDs must be unique
- Hello and Dead timers must be the same
- Authentication settings must match
- IP MTU settings must match
- OSPF Network Type must match
Types of LSAs
- Type 1 (Router LSA)
- Every router generates this type of LSA
- Contains: RID, interfaces, IP address/mask, current interface state (status)
- Type 2 (Network LSA)
- It is generated by the DR, and lists all the routers connected to that “multi-access” network (i.e. broadcast network type)
- Contains: DR and BDR IP addresses, subnet ID, mask
- Type 3 (Summary LSA)
- It is generated by the ABR, and lists all the subnet IDs and their masks outside that given OSPF area.
- Contains: Subnet ID, mask, RID of ABR that advertises the LSA
- Type 5 (AS-External LSA)
- It is generated by the ASBR (Autonomous System Boundary Router) to describe routes to destinations outside of the AS (OSPF Domain)
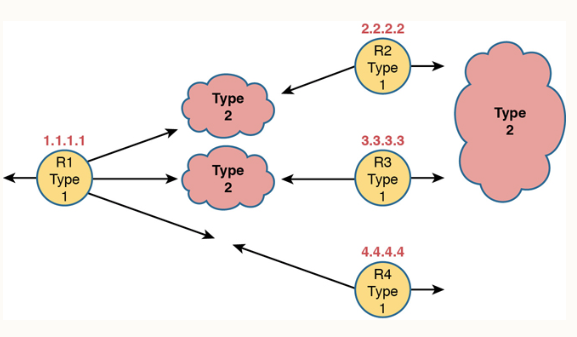 💡NOTE: In this case there is no Type 2 LSA between R1 and R4 because it is a serial connection, so there is no DR.
Troubleshooting